


What To Expect
To help your order run more smoothly, here is some information you should know.
Placing your Order
Once you have accepted your quote and signed the agreements, and we have received your deposit, we can release your stair to the shop.
Scheduling
Schedule is based on: your preference date, the date our shop can have materials fabricated and available installation dates. We will confirm your installation once all 3 of those dates are finalized. We may contact you about the time we expect you to be drywalling to confirm if your site schedule is running on track.
When you schedule your stair installation will directly affect the quality of your product.
It is suggested that your stair installation should happen: (1) after you have primed your drywall, (2) before your flooring is installed, and (3) after you have a controlled climate (heat/air conditioning and humidity.) A “controlled climate” means that the job site climate where the temperature is maintained between 60-80° F and humidity is between 30 and 50%.
Delivery
Jobs are generally delivered the day before install. You will get a text message the morning of the delivery letting you know we are loading and will be on our way soon. If you need more specific info on delivery of your job, please call 815-786-7600 x1005.
Stair material must remain unfinished until installation is complete. Finishing of stair material before installation is complete will void the warranty.
Install
Installers like to start early, often as early as 6am. You may have already coordinated a start time with us. If you have specific needs, please contact your salesperson or scheduling at 815-786-7600 x1005.
As a courtesy Designed Stairs will remove one-piece temporary stairs as are typically used in new construction. The stair will be left close the stair well or just outside a nearby door. Stairs that require disassembling (including temporary stairs) are the purchaser’s responsibility to remove before installation. Removal of existing stairs may also be a quoted service.
Site cleanup consists of broom sweeping. Standardly we put all scraps in a box and place in a location such as a dumpster or garage. Haul services may be quoted for remodels.
Balusters Installed at 2nd Trip
Process: Balusters to be installed at 2nd Trip / After Finishing of the Stair
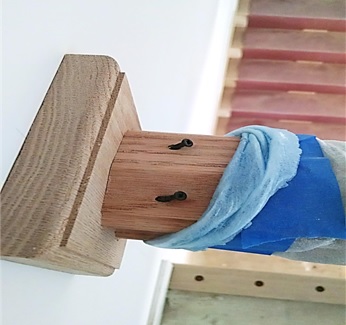
- Rails are temporarily set with long trim screws. The screw heads are exposed and protrude from the rail as shown here. When we return to install the balusters, the screws are removed. Once the balusters are installed, they will be sunk.
- When we come back to install the balusters, all the rails will be removed. If you have sunk the screws into the rail, it will require us to dig them out. This will not result in the best finish.
- After balusters are installed, your painter should use colored putty to fill these holes.
- Where the rail attaches to a fitting, we separate those joints, install the balusters, then re-join them. It is likely that we will need to sand these joints. This will require you to touch up stain, then clear coat your rails.
Painter Responsibilities
- Wall rails that are taken off the walls to paint, should be reinstalled by the painter.
- All tape and painter's coverings should be removed from the rails by painters prior to us coming out to install balusters.
- If balusters are being painted, ends of balusters (that go into the rail and stair/trim) should be clean with no drips or build up of paint (which could cause the baluster to no longer fit properly into the holes).
- Do NOT remove or set the screws. Finish the rail with screws as it is.
- You will need to fill the holes after balusters are installed. Suggested products are:
- Blend-Fil or Fill Stick (Minwax, Varathane, DAP)
- Color Putty (Minwax or Varathane)
- Hot Melt (Mohawk)
Customer Responsibilities
- Keep Balusters secure if at site. They are in your possession and your responsibility.
- Call us a minimum of two weeks before you need the balusters installed.
- Confirm painters wrapping is off rails (we charge for removing painters wrappings).
- Tell us where the balusters are stored.
- If there is a new way to get into site (code changed?) tell us that information.
Lived in Homes — Preparing for Remodel
Get ready for your day of installation:
- Remove all furniture, rugs and furnishings that are next to the stair or rails.
- Remove any art work on both sides of the walls where we will be working.
- We will be making dust (more than you might think). You may want to cover furniture and remove rugs that are nearby.
Replacing Your Stair
Replacing Your Stair
Stairs are a structural item. When you replace your stair, it is a major remodeling project. Removing the existing stair will create a lot of dust above and below the stair. Framing and drywall will need to be removed and, in some cases, existing walls will need to be removed. There may also be holes in the drywall that will need to be patched.
What Can I Expect From You on Installation Day?
- We will spread a tarp to protect your floors.
- If we are removing your existing stair, your upper floor level may not be accessible after the first day of installation.
- We will make a lot of dust when we remove your existing stair, newel posts, rails and/or balusters.
- We will remove our scrap and sweep up our work area.
- Tear-out will be left in a pile in a location you designate (typically garage). If you have contracted us to haul away your tear-out, a truck will arrive while our installer is there to load and haul your tear-out.
What Will I Need to Do After Installation?
- You should plan on vacuuming and dusting the entire area when we are done.
- The stair is installed unfinished. You will need to apply a stain, paint and / or a protective finish on the stair. Designed Stairs does not do any finishing.
(The stair should be finished as soon as possible after installation. The sooner you finish the stair, the less wood movement will occur. We recommend that you seal the underside of the stair as well.) - As is standard in all trim work, nail holes made during field installation are filled by the painter.
- You may need to patch drywall and spot paint walls.
Replacing Balusters
Replacing Balusters
What Can I Expect on Installation Day?
- We will spread a tarp to protect your floors.
- We will make some dust when removing your existing balusters.
- We will remove our scrap and sweep up our work area.
What Will I Need to Do After Installation?
- You should plan on vacuuming and dusting the entire area when we are done.
- Some touch up of the finish around the balusters may be needed.
- If the new baluster is smaller than the old baluster, some re-finishing may be required around the top or bottom of the baluster.
Caring for Your Stair
Protect Your Stair During Construction
Care must also be taken to protect the stair from dirt and mud. Most hardwoods are an open grain wood and when dirt gets embedded into the grain it is very difficult to remove, even with sanding. This will have a negative effect on the appearance and texture of the finish.
Upon completion of installation, we will tack down a brown paper runner for basic protection. If additional protection is needed, we offer:
- White Paper (Tuf Guard) provides more padding to help prevent small nicks.
- OSB tread covers are placed over our brown paper and provide the most protection.
NEVER COVER THE STAIRS WITH PLASTIC. Plastic does not allow airflow, trapping moisture underneath and causing the wood to expand and contract. This expansion and contraction causes the wood joints to open up and may cause the wood to crack.
Stair must be protected from relative humidity variations, excessive heat, cold, moisture, and direct sunlight.
Acclimation to the Job Site
The environmental conditions inside the house are critical to the quality of the stair. Designed Stairs uses lumber that has been dried through a very controlled process to a moisture content of 6 – 8%. This matches the moisture content inside the average home and allows the wood to remain stable under normal conditions.
In cold climates, when a house is heated to a high temperature in winter, the air can become very dry, causing the wood to shrink. This shrinkage can make cracks visible in the wood and joints may begin to open up. Subjecting a stair to high levels of heat is like putting it in an oven and will accelerate the deterioration of the stair.
All hardwoods must be sealed on all sides to retard movement and protect from exposure to elements and damage. It is recommended to seal wood immediately.
Finishing Your Staircase
Finishing of the stair must be completed not more than 30 days after installation. Raw wood is more susceptible to temperature and humidity variation than finished wood. Note: Finishing means the sealing and staining of the stair in accordance with the manufacturer’s directions.
Woods such as cherry and maple, which are affected by sun or artificial light, should be finished immediately to limit coloration changes.
Although the stair has already been sanded to a level ready for finishing by Designed Stairs, for best results, some additional preparation is recommended prior to applying stain. Your finisher should do a light sanding of all parts and use a "hard filler" in all fastener holes. First, they should do a careful inspection of the stair with a light to detect any damage that may have taken place after installation. This sort of damage is usually minimal and can be easily sanded out. Dirt or mud on the stairs can often be removed with sanding and a vacuum cleaner. Just prior to application of the finish, the stair should be blown off with compressed air and wiped with a tack rag to remove any fine dust. We recommend sealing the underside of all stairs to prevent the absorption of moisture.
Nail holes are to be filled by your finisher, as is the industry standard with all trim.
See our Product Care Guide under the Reference section of portal for more detailed information.
If you have further questions, do not hesitate to ask. We have years of experience with most wood species from harvesting through finishing and would be happy to answer any questions you may have.

